
TL;DR
Adding a Google calendar to a WordPress blog is simple and customizable. First, create and make your calendar public in Google Calendar’s settings. Then, customize the look and view of your calendar and copy the iframe code provided to paste into your blog post or sidebar text widget. There are many customization settings available to suit your needs.
Google provides it’s calendar services for free. You can create and add your own events for particular dates in a new calendar or you can just add another tons of interesting calendars using it’s Browse Interesting Calendars feature or you can even add a friend’s calendar. Just log-in to your Google account and follow the below link:-
https://www.google.com/calendar
You can fiddle around with the settings and get to know all the features you like, but right now, I’m just going to show you how to add it in a WordPress blog.
There are many plugins available to add the Google calendar to your blog, but in my opinion and experience, the way of copying the iframe code from Google calendar itself and using it in your code is quite simple and the best. It provides many customization settings and looks to satisfy every person out there. Check out some of its looks below (The calendar I’m using is Holidays In India):-
This displays the month view of the calendar:
This displays the week view of the calendar:
The third one which displays the agenda only is my personal favorite one and I believe will be yours too, as this view displays only the events that matter and also it can fit nicely into your blog’s sidebar. Check it out:
As you can see it’s pretty neat and future events are also loaded automatically as one scrolls down the scroll bar. Although, there’s one thing to keep in mind if you are using a personal calendar. Before you try to display it anywhere, you have to make it public through the “sharing” settings. For this go through the below steps:-
- Open your calendar using the link: https://www.google.com/calendar
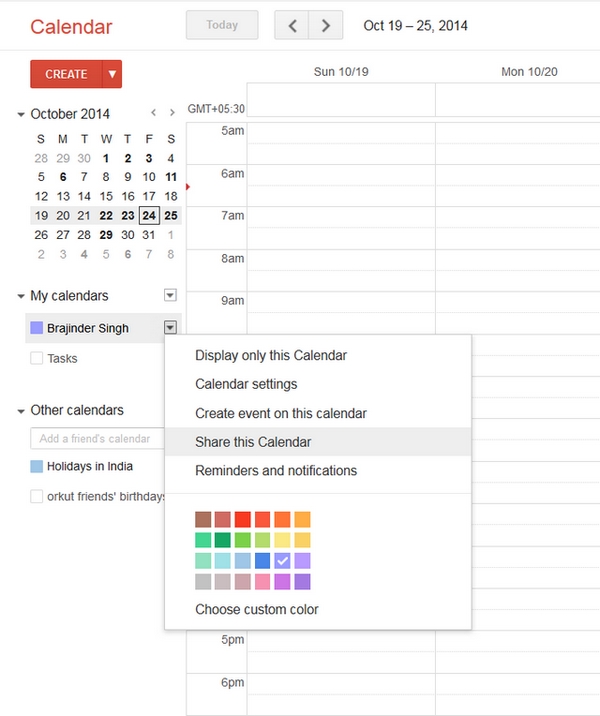
- Choose your calendar through the left sidebar. Just hover over it and you’ll notice a dropdown appears beside it.
- Click on the dropdown and choose “Share this Calendar”.

- Click on the “Make this calendar public” checkbox to make it public. If you are a freelancer, the “Share only my free/busy information” setting underneath it would really come in handy.
That’s it! Your calendar is now public and is ready to be displayed.
Now follow the steps below to share it in any way like the above.
- Once it’s public, go back and again hover over the chosen calendar and click on the dropdown icon. Choose and click on the “Calendar settings” option this time to enter the main settings.

- Once there, in the “Embed This Calendar” row, click on the “Customize the color, size, and other options” options to customize the looks or view of the calendar. (Click on the highlighted area shown in the image below)

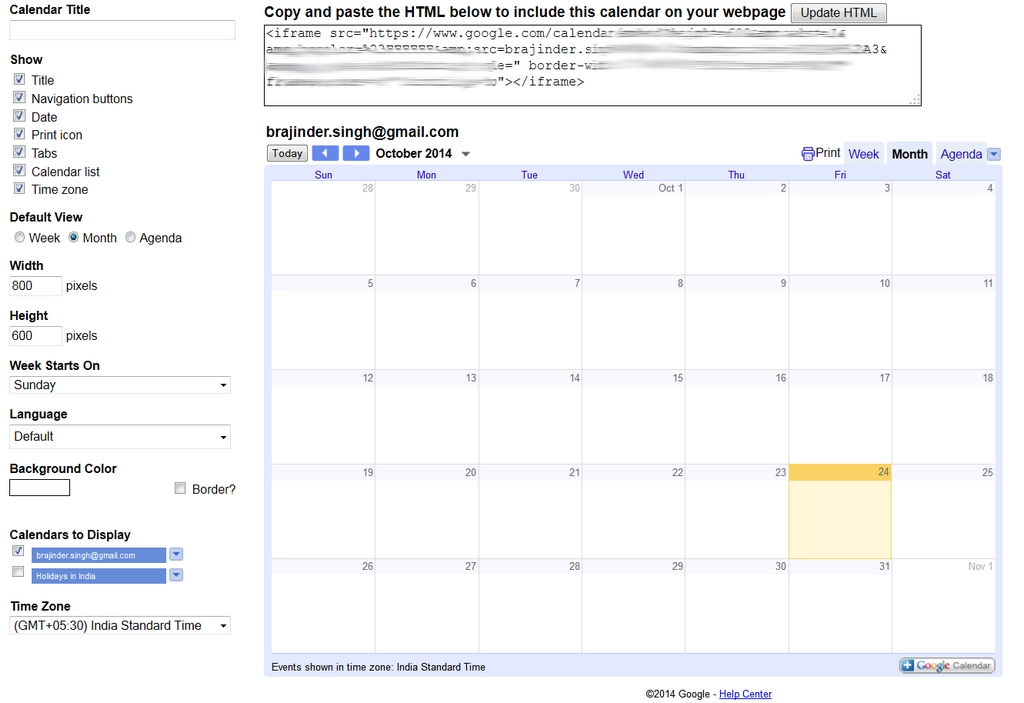
- There you can set your calendar title, select the default view i.e. the view that will be shown on your blog, change the height and width to suit your desired area on the blog and many others.
- Once done, just copy the iframe code in the “Copy and paste the HTML below to include this calendar on your webpage” section above the calendar (shown blur in the image below), and paste in your post or sidebar text widget. If something’s not right you probably have to click the “Update HTML” beside the “”Copy and paste the HTML below to include this calendar on your webpage”” heading and then copy the iframe code.


That’s it! you are done.
If you have any questions, suggestions, or feedback, feel free to comment below and check out our web development services and pricing page
Thank you.
We are a Website Development, WebApp Development, and Digital Marketing Company, providing services to enterprises of all shapes and sizes, across the world. In our blog, we talk about the latest in Tech, Technical Tutorials, and our general opinions, among other things 🙂 Please feel free to reach us through the comment box or via the contact us page if you’d like to know more about our services.