TL;DR
Article teaches how to create a simple image upload form for a website using PHP (procedural) and MySQL. You need to create an HTML/PHP page for the form, create a MySQL database, and write PHP code to insert the image into the database and upload it to a desired location. The article provides sample code and database values.
In this article I’m going to show how one can create a simple image upload form for their website using just PHP (procedural) and MySQL.
First we have to create a simple form, which will be the user interface i.e. where the user /admin can browse and select the image that he/she wishes to upload. Along with the image one can also add a brief info regarding the image. This simple form can be saved as an HTML page or a PHP page. No PHP code will be used inside it, but I prefer saving it as a PHP page. We’ll name this page img_upload.php.
To create the page, open your editor (I use notepad++) and write the usual HTML tags such as, DTD, head, meta, body etc. In the body tag, create a form. Within the form tag, in addition to the “action” and “method” attribute, add another attribute “enctype”, having value”multipart/form-data”. The value of the “action” attribute will be the link of the PHP file/page where the actual coding for inserting the pic into the database will be done.
![]()
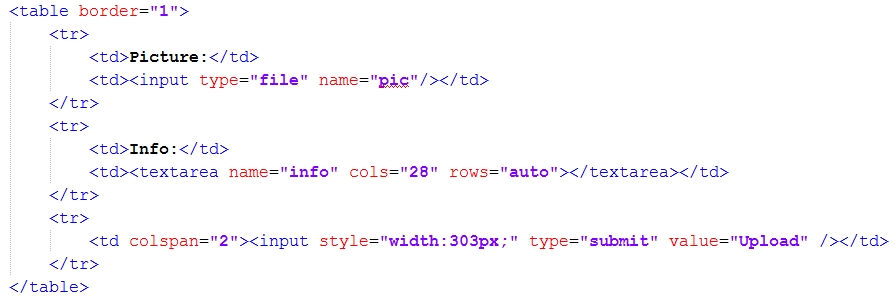
Now, for a more aesthetic look, I’ve used tables to create the user interface. It’s very simple and just to solve the purpose of this post. You can create your own page using div and advance CSS to create the upload form. To upload a picture we have to use the input tag and type=”file”. For the brief info, we can use a text area. The exact table content is shown below:
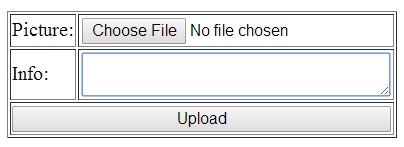
Close all the tags and we are done with the user interface. The output of this form in the browser will be like below:
After this we work on the PHP code and the MySQL database. First we have to create a database where the details regarding our image will be stored and from where we could recall it wherever and whenever we like, in our website. I’m going to use the MySQL UI through PHP My Admin to directly create the database. Assuming that you know how to do it, I’m just going to let you know the exact values I’ve used in creating the database, as those would be used in the insert pic PHP file. The database values are:-
Database name: cms
Table name: pics
Number of columns: 3
Column names: Id (Primary, Auto Increment, Int), pics (Varchar), info (Varchar)
Now the last part, the insert pic PHP file. First create a simple database connection which we may include in pages where we would be using this database. We’ll name it conn.php.
The coding for conn.php is:-
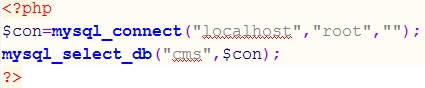
If you are using a proper server, then replace the values localhost with the server name, root with the username and the last value will be your password.
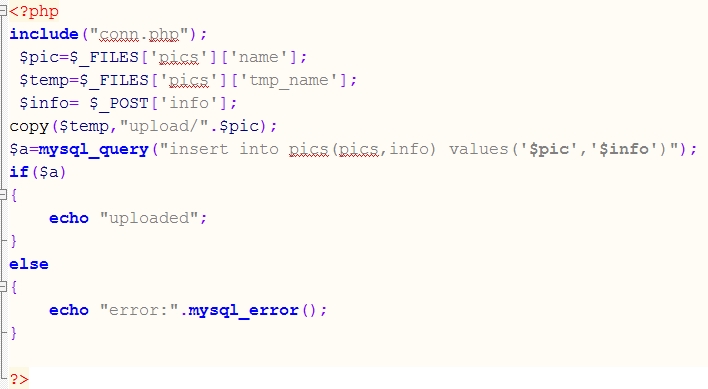
For the main PHP file, which we’ll name insert_pic.php, the coding is shown below. Notice that the form which we had created above redirects the input to this page.
First we include the conn.php file into our page. Then we create a variable $pic in which we’ll save the uploaded image details using the super global variable $_FILES. This will hold the data of the input type=”file” from our form and it’s name. Now, before the image can be saved on to a known location on the hard drive, it has to be saved temporarily on the system during the upload. For this we’ll create another variable $temp and again using the super global variable $_FILES, we’ll save the data, but this time we’ll assign it a temporary name using ‘tmp_name’ value.
![]()
*Correction: If you are getting an error then most probably because it should be $_FILES[‘pic’][‘name’] and $_FILES[‘pic’][‘tmp_name’] i.e. ‘pic’ instead of ‘pics’
The third thing to do is to retrieve the brief info from the textarea column. For this we’ll create another variable $info and simply use the super global variable $_POST to get the info.
After this, we’ll copy the image from the temporary folder to the desired location. For this we’ll use the copy command and copy and past the image into the folder “upload”. If you want to copy the image in the same directory as with all your other files then just use the folder name, otherwise write the full path to the folder and concatenate with the $pic variable. See below:
![]()
Then run the MySQL query, insert into pics(pics,info) values (‘$pics’,’$info’). The complete code can be seen below:
That’s it. You are done. Check out the form and upload a sample image to make sure that everything works fine. The image will be placed in the upload folder and it’s name and info will be added into the database.
If you are looking for a reliable team to manage your web development, consider checking out our web development services and pricing page. So in case any of you guys reading this has anything worthwhile to contribute or point out, please share in the comments section below and contact us today!
Thank you
We are a Website Development, WebApp Development, and Digital Marketing Company, providing services to enterprises of all shapes and sizes, across the world. In our blog, we talk about the latest in Tech, Technical Tutorials, and our general opinions, among other things 🙂 Please feel free to reach us through the comment box or via the contact us page if you’d like to know more about our services.